How to Create an AI Passport Photo on Your Phone
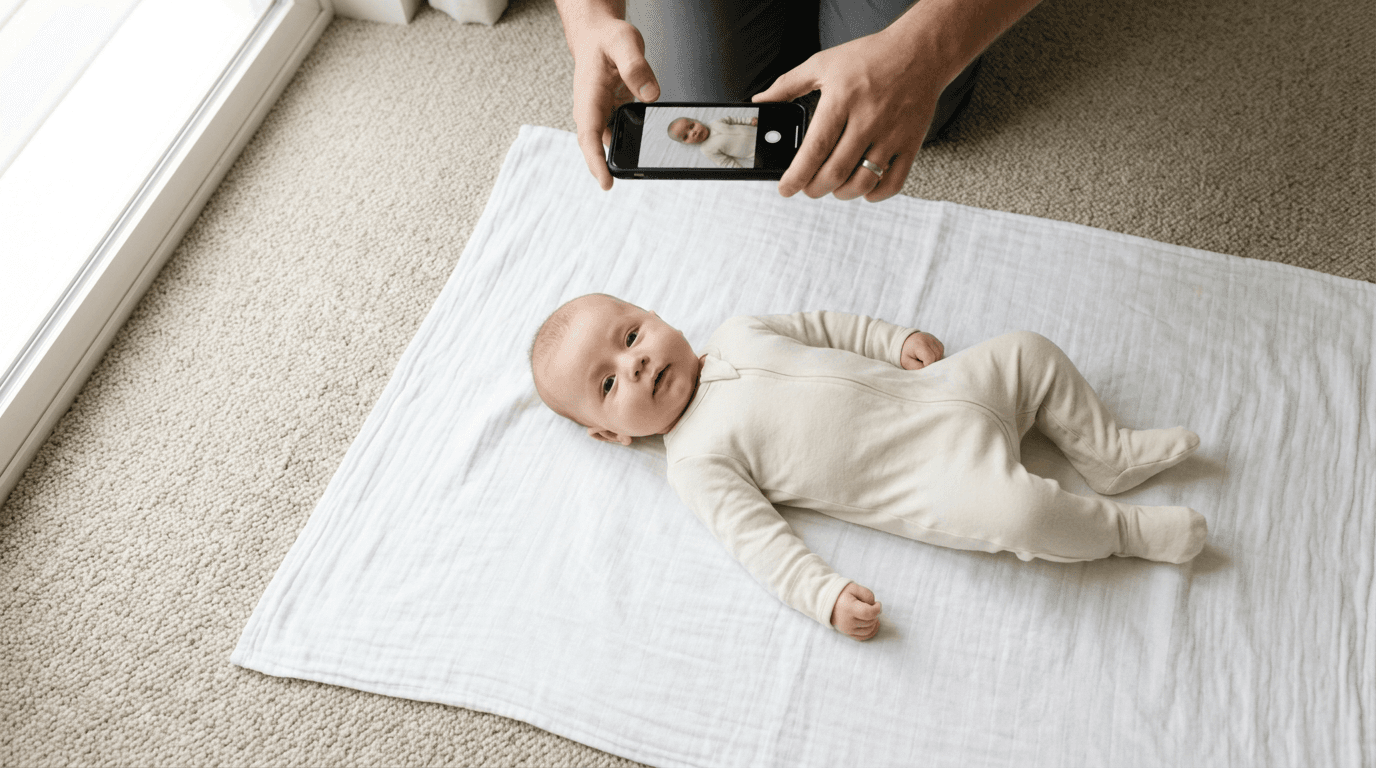
A newborn does not take directions, hold a pose, or care about the sterile white background at a pharmacy photo counter. Taking an infant to a physical studio often ends in frustration, wasted time, and a rejected application because the baby refused to keep their eyes open or head straight. AI passport photo tools allow parents to solve this at home, turning a momentary calm on a living room rug into a government-compliant biometric image in seconds.
Quick Summary
Generating an AI passport photo on your phone replaces the stress of studio visits with automated compliance checks and background removal. Instead of struggling with lighting or posing an infant in a public space, you can take a picture at home and let software handle the strict government formatting rules.
- Use natural light: Place the infant near a window facing the light to avoid harsh shadows.
- Secure the background: Lay the baby on a plain, light-colored blanket or sheet.
- Center the face: Ensure the camera is level and the child's face is fully visible.
- Let AI process: Upload the image to an AI tool to automatically crop, size, and replace the background to meet exact biometric specifications.
Table of Contents
- 1. Prepare the Setting
- 2. Position the Infant
- 3. Capture the Image
- 4. Process with AI
- Common Pitfalls & Troubleshooting
- FAQ
- Recommended Reads
1. Prepare the Setting
Lighting is the most frequent reason government agencies reject homemade passport photos. Shadows across the face, behind the ears, or on the background instantly disqualify an image, especially for biometric processing. When you take a passport photo on your phone, you are acting as the studio lighting director. The goal is flat, even illumination that reveals facial features without creating high-contrast dark spots.
The most reliable source for this is indirect sunlight. Position your setup near a large window, ideally during the morning or late afternoon when the light is softer. Do not use direct, harsh sunlight, which makes the infant squint and creates sharp shadows under the nose and chin. Turn off overhead artificial lights in the room, as mixing color temperatures (the blue of daylight and the yellow of indoor bulbs) confuses the camera sensor and leads to unnatural skin tones.
Practical rule: If you hold your hand flat above the surface where the baby will lie and see a sharp shadow, the light is too direct; diffuse it with a sheer curtain or move further from the window.
2. Position the Infant
For infants, the traditional sitting pose against a wall is impossible. The standard approach when you make your own passport photo is to lay the baby on their back. Use a firm, flat surface, like the floor or a firm mattress, covered with a plain, light-colored sheet or blanket. While AI tools will replace the background later, starting with a neutral, solid color makes the software's edge-detection work much more accurately. A patterned blanket forces the AI to guess where the blanket ends and the baby's clothing begins, often resulting in jagged cutouts.
Ensure the baby's head is straight, looking directly up at the camera lens. Both ears should be visible, or at least both sides of the face should be symmetrical. Avoid having the child tilt their head back or tuck their chin to their chest. If the baby is prone to rolling or turning their head, you may need a second person to gently hold a toy near the camera lens to capture their attention for the split second required.
3. Capture the Image
Stand directly over the baby. The camera lens must be parallel to the infant's face. If you angle the phone, it distorts the facial proportions, making the forehead or chin appear disproportionately large. This distortion, called perspective skew, changes the biometric distances between the eyes, nose, and mouth - metrics that government systems use to verify identity.
Take the photo from about three to four feet away. Do not zoom in using the phone's digital zoom, as this degrades the image quality. Getting too close also creates barrel distortion (a fish-eye effect). You want a wider shot that includes the baby's shoulders and plenty of space around the head. The AI tool will handle the precise cropping later. Take multiple photos in quick succession (burst mode is helpful) so you can choose the one where the eyes are open and the expression is neutral.
The most common mistake at this stage is capturing your own shadow falling over the baby. If the light source is behind you, your body blocks it. Stand to the side of the light source, ensuring you cast no shadows across the infant's face or the background directly behind them.
4. Process with AI
Once you have a clear, well-lit photo with a neutral expression, the manual work ends. Uploading the image to an AI passport photo platform automates the complex formatting rules that vary significantly between countries. The software first maps the facial features to identify the exact center of the eyes and the top of the head. It uses these points to scale the image so the head size falls exactly within the required millimeters (e.g., 25-35mm for a US passport, or 32-36mm for the Germany Baby Passport Photo Guide).
Next, the AI detects the edges of the infant and digitally removes the original background, replacing it with the precise shade of white or light grey required by the target country. It then applies the correct crop ratio, generating a 300 DPI digital file ready for submission or local printing. Attempting to manually crop and size a photo on a smartphone using standard photo editing apps almost always fails because those tools lack the specific biometric overlays required to verify compliance.
Common Pitfalls & Troubleshooting
Even when using a smartphone to capture an infant's passport photo, several issues mimic each other but require different fixes.
The 'Floating Head' Effect
Symptom: After processing, the infant's head appears detached from their body, or the edges around the hair look artificially sharp and jagged. Diagnosis: The original background was too busy or matched the clothing color too closely, confusing the AI's edge detection. This is the most common reason AI backgrounds fail. Fix: Retake the photo using a plain background that contrasts sharply with the baby's hair and clothing.
Red-Eye and Flash Glare
Symptom: The baby's pupils are glowing red, or there are stark white reflections on their cheeks or forehead. Diagnosis: The phone's flash was triggered. Fix: Turn off the flash completely. Rely only on natural, indirect sunlight. A flash washes out features and creates hard shadows that cause immediate rejection.
Incorrect Proportions
Symptom: The AI software flags the image as non-compliant because the head is too large or too small for the frame, despite it looking fine on your screen. Diagnosis: The original photo was taken too close, causing perspective distortion, or the image was cropped before uploading. Fix: Retake the photo from at least three feet away and upload the raw, uncropped image. Let the AI handle the sizing.
Closed Eyes or Unnatural Expression
Symptom: The infant is squinting, crying, or looking away from the lens. Diagnosis: Poor timing or distracting environment. Fix: Patience. Wait for a calm moment, usually after feeding. Use a noisemaker near the camera lens, not off to the side, to draw their gaze dead center.
FAQ
Can I use a smartphone to take a passport photo?
Yes, modern smartphone cameras have sufficient resolution. The challenge is meeting the strict lighting and background requirements, which is why processing the raw image through an AI tool is necessary for compliance.
Can a baby's eyes be closed in a passport photo?
Generally, no. Most countries, including the US, require the infant's eyes to be open and visible. There are rare exceptions for newborns under a few weeks old, but open eyes remain the standard requirement to avoid rejection.
Do I need a white background when taking the photo at home?
It helps, but it does not need to be perfectly white if you use an AI tool. Use a solid, light-colored sheet to help the AI easily distinguish the baby from the background before it replaces it with pure white.
What if my baby's photo gets rejected?
If the photo fails a government check, you must submit a new one. Services often provide a 100% Refund Policy if an image they verified is rejected due to formatting errors.