How to Take Passport Photo at Home: A Practical Guide
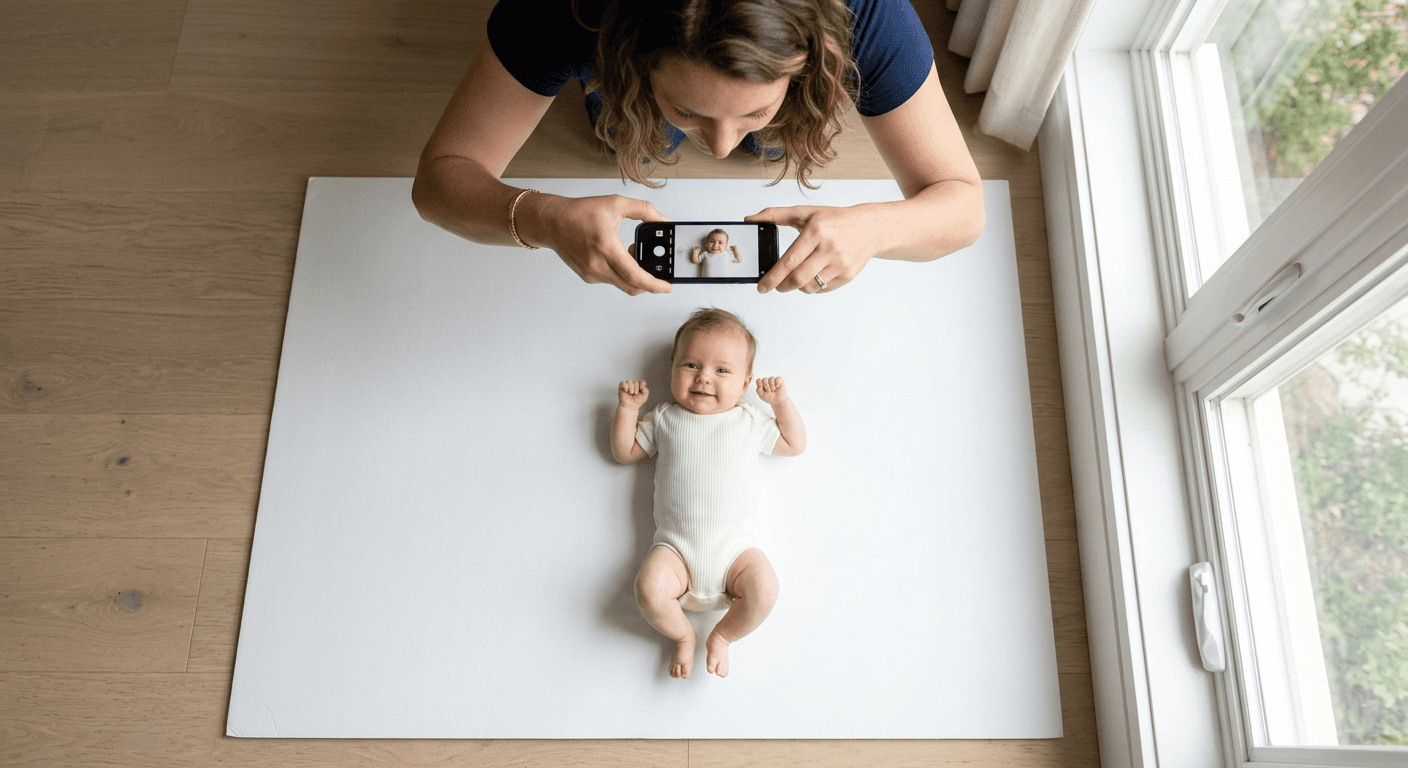
Anyone who has tried to support a squirming infant against a white pharmacy drop-down screen while a clerk waits impatiently knows exactly why the traditional process breaks down. You pay fifteen dollars for a single rushed exposure, only to find out weeks later that a stray shadow or a slightly tilted head triggered a government rejection. In an era of extended document processing delays, a single rejected photograph can derail an entire family trip, pushing an application back to the end of a multi-week queue.
Deciding to take passport photo at home removes the rush and the rigid scheduling, but it introduces strict technical responsibilities. Government biometric scanners do not care how difficult it was to get your child to look at the lens. They measure interpupillary distance, verify uniform background exposure, and check for digital manipulation down to the pixel level. If you want to make your own passport photo that actually passes agency review on the first try, you have to build a compliant capture environment. You become both the photographer and the compliance officer.
Quick Summary
To successfully take passport photo at home, you must replicate the controlled lighting and precise biometric framing of a professional studio. A compliant image requires flat, indirect light, a neutral expression, and specific head-to-chin proportions against an untextured background, free from shadows or digital airbrushing.
- Use diffuse natural window light to eliminate facial and background shadows.
- Maintain a minimum of four feet between the camera and the subject to prevent facial distortion.
- Frame the shot loosely from the mid-chest up to allow for precise cropping later.
- Never apply beauty filters or manual airbrushing before submitting the file.
Table of Contents
- 1. Configure the Capture Environment to Take Passport Photo at Home
- 2. Establish Camera Distance and Positioning
- 3. Frame the Subject for Biometric Cropping
- 4. Capture a Compliant Posture and Expression
- 5. Process the Image for Strict Government Standards
- Common Pitfalls & Troubleshooting
- FAQ
- Recommended Reads
1. Configure the Capture Environment to Take Passport Photo at Home
Flat Illumination Prevents Biometric Rejection
The single most common reason home applications fail is improper lighting that creates shadows either on the face or directly behind the head. You cannot fix bad lighting in post-production without violating the government's strict rules against digital manipulation. If an automated scanning system detects artificial brightening or exposure brushing, it rejects the file immediately.
The mechanism for a compliant photo is flat, even illumination that reveals the true skin tone without high-contrast shadows. To achieve this, stand facing a large window during daytime hours, ensuring the sunlight is entirely indirect. Direct, harsh beams of sunlight will blow out the exposure on one side of the face, causing one cheek to appear stark white while the other falls into shadow. Conversely, overhead room lighting - like standard ceiling bulbs - casts deep, disqualifying shadows under the eyebrows, nose, and chin. Turn off all interior room lights entirely to avoid mixing the yellow color temperature of indoor bulbs with the blue daylight from outside.
For your background, locate a smooth white or off-white wall. If your walls are textured, heavily marked, or colored, drape a cleanly ironed white bedsheet over a door.
The mistake people actually make here is instructing the subject to stand with their back touching the wall. When a person leans against the backdrop, the primary light source casts a hard drop shadow right behind their ears and shoulders. The fix is physical separation. Pull the subject at least two to three feet away from the background. The window light will wrap around their profile, illuminating both the face and the wall independently. If photographing an infant who cannot sit up independently, lay a thick white poster board flat on the floor in a patch of indirect window light and shoot directly from above, ensuring your own body does not cast a shadow onto the mat.
2. Establish Camera Distance and Positioning
Optical Proportions Require a Four-Foot Distance
Smartphone lenses are built with naturally wide focal lengths. If you hold a phone eighteen inches from a subject’s face to fill the frame, the optical distortion will artificially enlarge the nose, bulge the forehead, and narrow the ears. This geometric distortion routinely causes passport software to flag the image as an inaccurate biometric record, even if the person looks acceptable to the human eye.
If you want to know how to take your own passport photo without triggering this wide-angle warping, you must rely on optical distance rather than physical proximity. Position the camera at least four to five feet away from the subject. At this specific distance, the facial features flatten into their true, proportional alignment across the image sensor.
The common failure mode at this step is the shooting angle on the vertical axis. If you tilt the phone down from above, the forehead dominates the frame and the chin recedes. If you shoot from below, the jawline expands and the nostrils are over-emphasized. The camera lens must be perfectly parallel to the subject's face and aligned exactly at the subject's eye level.
Practical rule: If you can see the top of the subject's shoulders plunging downward or angling upward in the viewfinder, your camera is tilted; the collarbone and shoulders should appear relatively flat and level across the bottom quarter of your framing.
If you are taking a self passport photo, do not attempt to rely on your arm length. A selfie stick or a fully extended arm torques your shoulders unnaturally, pulling one arm out of the frame, and usually falls short of the necessary four-foot minimum distance. Instead, mount the phone on a tripod at eye level, set a short timer, or ideally, ask another person to hold the device and verify the framing parameters.
3. Frame the Subject for Biometric Cropping
Loose Framing Survives the Mandatory Print Ratios
A compliant document requires precise head-to-chin measurements strictly enforced within the final printed border. For the United States, the head must measure exactly between 1 and 1 3/8 inches on a physical 2x2 inch print. Attempting to frame this exactly in the camera viewfinder in real-time is a guaranteed way to fail, as a millimeter of movement throws off the ratio entirely.
Instead, the proper mechanism is to shoot loose. The goal of the raw capture is to give yourself an adequate environmental buffer to crop the image precisely during the formatting stage later on. Frame the shot so it captures the subject from the middle of the chest to about twelve inches above the top of their head. Leave ample white background space on both the left and right sides of the shoulders.
The frequent mistake here is utilizing smartphone digital zoom. Users do this to achieve a closer crop. Digital zoom on consumer phones does not change the optical focal length. It simply crops the sensor's pixels and artificially enlarges them, severely degrading the file's resolution. Attempting to print this digitally zoomed photo at the mandatory 300 DPI threshold causes problems. The edges of the face will appear jagged, pixelated, or soft. This leads to an automatic rejection for poor image quality.
Shoot at the phone's native 1x focal length from your four-foot distance. You must rely on the high-megapixel output of modern image sensors to retain absolute sharpness when you eventually crop the file. For exact sizing dimensions and to see how much background space is required around the head for different jurisdictions, review the Canada Baby Passport Photo Guide which details similar strict background framing requirements before final processing.
4. Capture a Compliant Posture and Expression
Forced Reactions Ruin the Neutral Posture
Government agencies reject thousands of applications weekly because the subject is smiling, tilting their head, or wearing prohibited items. The biometric standard demands a completely neutral facial expression, with both eyes visibly open, looking straight ahead, and the mouth entirely closed without a visible grin.
The mechanics involve ensuring the subject looks straight into the center of the camera lens, not down at the smartphone screen below it. Both ears (or the extreme edges of the face, if hair volume covers the ears) must be equally visible to confirm the head is not rotated even slightly to the left or right. You are legally required to remove all glasses, including standard prescription lenses, as well as hats, headbands, heavy hair clips, and infant pacifiers. Religious head coverings are permitted, provided you supply a signed statement with the application, but the covering must not cast any shadows whatsoever on the face or obscure the natural hairline.
The defining mistake when photographing young children is attempting to force a reaction. Parents naturally make noises, snap their fingers, or say "cheese" to get an infant to look at the camera lens, which universally results in an open mouth, a smile, or a tilted head. The required approach is passive patience. Set the camera up, maintain absolute quiet, wait for the child to return to a blank, neutral stare, and capture a rapid burst of photos. Do not coach the expression; just wait for the resting face to appear naturally. Consult the Help Center for technical clarifications regarding acceptable newborn facial posture, as infants are occasionally granted minor leniency on half-closed eyes depending on the region.
5. Process the Image for Strict Government Standards
Digital Manipulation Triggers Immediate Disqualification
Once you secure a perfectly lit and framed raw photograph, you must process it to meet exacting dimensional and resolution requirements before routing it to a printer. A standard United States photo must measure exactly 2x2 inches (51x51 mm) and print at a minimum density of 300 pixels per inch. Other global regions enforce entirely different dimensions; the Singapore Baby Passport Photo Guide outlines the 35x45 mm metric requirement common across many international borders.
The mechanics of this final step involve cropping the original high-resolution image so the subject's head is perfectly centered horizontally, with the eyeline falling specifically in the middle third of the vertical space. You can use standard desktop photo editors, maintaining absolute strictness regarding the output physical print dimensions and verifying the background registers as pure white or off-white.
The fatal mistake at this processing stage is applying software beauty filters or utilizing the 'magic eraser' and 'portrait mode' tools built into modern phone galleries to clean up the background. If a passport agency detects biometric document tampering at the pixel level - including skin smoothing, red-eye removal, or sloppy manual background painting - they will reject the application immediately.
If your background is insufficiently white due to lighting limitations, you must rely on a dedicated compliance tool that extracts and replaces the background entirely at the structural layer without smudging the subject's hair or skin. Rather than risking a manual crop, you can process the image through the US Baby Passport Photo Maker, which automates these biometric measurements, verifies the head proportions against the strict government template, and formats the output sheet for printing at standard retail pharmacies.
Common Pitfalls & Troubleshooting
Even with a rigid setup and careful framing, minor environmental factors can render a seemingly perfect photo invalid. The following are the most frequent rejection triggers that look identical to a passing photograph at a casual glance. Identifying these failures before you submit the application saves weeks of delay.
The Background Drop Shadow
- Symptom: A dark halo, gradient shadow, or sharp silhouette appearing directly over the subject's left or right shoulder against the white wall.
- Diagnosis: The primary light source is hitting the subject at a horizontal angle, and the subject is standing too close to the wall itself. This is the single most frequent cause of automated compliance rejection.
- Fix: Move the subject at least 24 to 36 inches forward, directly away from the wall. Turn their body so they squarely face the window, ensuring the natural light hits the center of the nose rather than the side of the cheek.
The Red-Eye Flash Artifact
- Symptom: The subject's pupils appear red, white, or artificially glowing, often accompanied by harsh, greasy reflections on the forehead and cheeks.
- Diagnosis: You triggered the smartphone's built-in LED flash while shooting in a dim room.
- Fix: Turn off the camera flash completely in your camera app settings. Do not attempt to use the phone's built-in "red-eye reduction" tool in the photo gallery, as this digitally paints over the pupil and counts as illegal image manipulation. Move the shoot to daytime hours and rely exclusively on indirect ambient sunlight.
The Floating Head (Clothing Blend)
- Symptom: The subject appears to be a disembodied head because the fabric of their shirt seamlessly matches the white background.
- Diagnosis: The subject is wearing a white, cream, or very pale gray top that lacks visual contrast with the mandatory white backdrop.
- Fix: Change the subject into a dark, navy, or vividly colored shirt. The visual boundary between the shoulders and the background must be sharply defined for government biometric cropping tools to successfully recognize the dimensions of the torso.
The Asymmetrical Shoulders
- Symptom: One shoulder appears significantly larger, wider, or higher than the other in the frame, even though the head is facing forward.
- Diagnosis: The subject's torso is twisted. The face might be directed at the lens, but the body posture is angled away.
- Fix: Ensure the subject's chest, hips, and toes are pointing exactly parallel to the camera sensor. If photographing an infant from above, ensure their spine is perfectly straight on the mat.
FAQ
Can I use a smartphone to take a passport photo? Yes, modern smartphone cameras possess more than enough sensor resolution to capture a compliant 300 DPI passport image. The key to succeeding with a phone is turning off portrait mode, disabling all automatic beauty filters, wiping the camera lens clean of fingerprints, and standing far enough away (at least four feet) to prevent wide-angle lens distortion from altering the facial structure.
How do I make my own passport photo without a white wall? If you lack a blank, untextured white wall in your home, you can drape a cleanly ironed white bedsheet or tape a large piece of matte white poster board over a doorway. Ensure there are no creases, dark fabric patterns showing through, or visible seams behind the subject's head. The material must be completely opaque and matte to prevent glare.
Is it permissible to edit out a blemish, scratch, or red-eye? No. Government guidelines strictly forbid any digital retouching of the face or eyes. Do not use spot healing tools, skin softeners, red-eye correction, or mole-removal features. The photograph must represent your true, unedited physical appearance at the time of capture. A temporary blemish is acceptable; digital manipulation is an automatic rejection.
Why did my photo get rejected for "incorrect head size" if I cropped it to exactly 2x2 inches? Cropping the outer dimensions of the file to 2x2 inches does not guarantee the inner proportions are correct. The subject's head must measure specifically between 1 inch and 1 3/8 inches from the bottom of the chin to the top of the head within that 2x2 square. If you frame the shot too tight or leave too much background space, the internal head size will fail the biometric template.